
The thaw is showing its face, and with it, the irresistible urge to get the bike out of the garage again. But after several months of hibernation, often in a cold, sometimes damp place, your steed deserves more than a simple wipe-down before its first outing. A proper spring tune-up prevents breakdowns, extends the life of your bike, and, above all, guarantees your safety from the very first pedal stroke. Here are the 7 points to check methodically.
Why a spring tune-up is essential after winter
Cold, dampness, and inactivity during winter silently fatigue components. Tires lose pressure, cables can corrode, grease freezes in bearings, and the battery of an e-bike loses capacity if stored with a low charge. A systematic check prevents three common pitfalls: breakdowns during rides, accelerated wear leading to unnecessary expenses, and more seriously, accidents caused by failing brakes or improperly tightened wheels.
It's impossible to assess chain wear or a nascent tire crack under a layer of dried mud. Start with a thorough cleaning: warm water, mild soap (black soap or a dedicated bike cleaner), a soft-bristled brush for the frame, a firmer brush for the drivetrain. Work from top to bottom, and finish with the wheels.
The right soap and water protocol (and what to avoid)
Avoid high-pressure washing at all costs: it forces water into the bearings (bottom bracket, hubs, headset) and speeds up their seizing. WD-40 is also not suitable for brake discs; it makes them greasy and inoperable. After rinsing, dry with a microfiber cloth, then let the bike rest for 30 minutes before lubricating.
2. Check the tires: pressure, wear, cracks
Three things to check on every tire: the pressure, the tread depth (if any is left), and the absence of cracks on the sidewalls. An underinflated tire prematurely wears out the inner tube and increases the risk of pinch flats, in addition to making pedaling much less enjoyable.
Ideal tire pressure by bike type
Road bike: 6 to 8 bars depending on cyclist's weight and tire width. Mountain bike: 1.8 to 2.5 bars depending on terrain and type (tubeless or not). City or gravel bike: 3 to 5 bars depending on width. The recommended pressure is always indicated on the sidewall of the tire: respect it. A cracked tire or one with a collapsed sidewall must be replaced even if the tread appears fine: a blowout at 30 km/h is not an option.
3. Test the brakes (pads, calipers, rotors)
Lift the front and then the rear of the bike, spin the wheels, and operate each brake. The wheel should stop instantly, without any abnormal metallic noise. Then check the thickness of the pads (on V-brakes) or the brake pads (on disc brakes).
Signs indicating a replacement
- Rim brake pads: if the wear indicator groove has disappeared, replace them.
- Plaquettes de frein : garniture de moins de 1 mm d'épaisseur = remplacement immédiat.
- Warped, wavy, or worn disc below minimum thickness mark = replacement.
- A squealing brake that doesn't stop suddenly means an appointment at the workshop without delay.
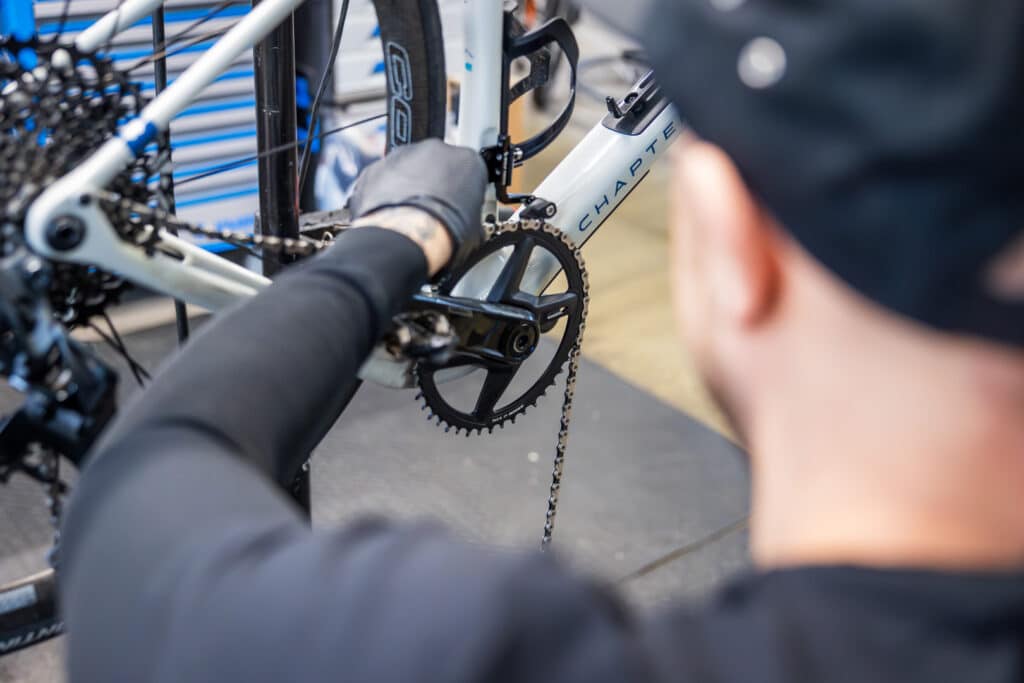
4. Check the transmission and chain
The chain is the most mistreated part of a bicycle. A worn-out chain prematurely damages the cassette and chainrings, and the bill quickly adds up. A few minutes of inspection can save you tens, even hundreds, of euros.
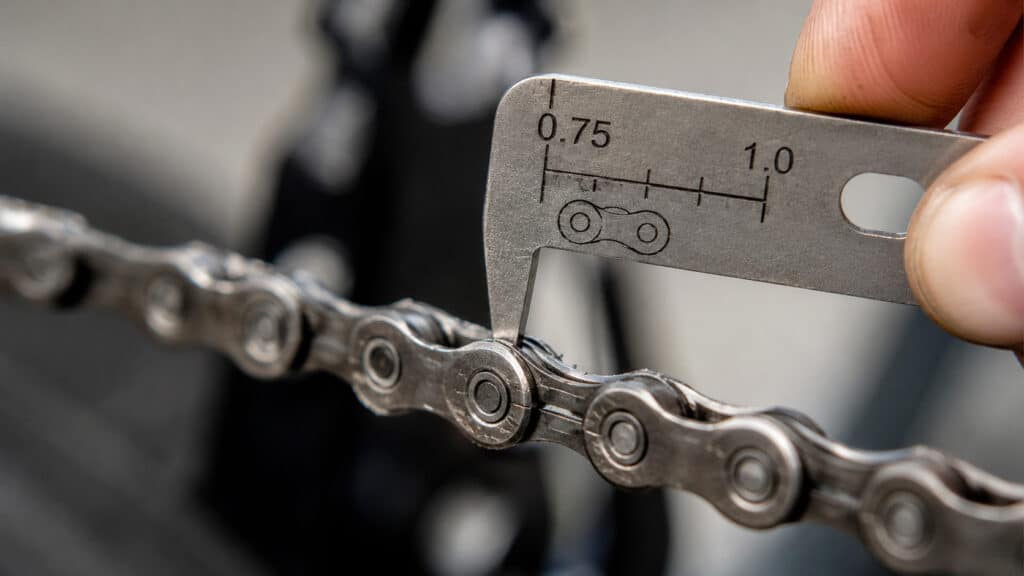
Measure chain wear with a gauge
The tool costs about ten euros and slips between two links. If the «0.75» gauge fits = monitor closely. If the «1.0» gauge fits = replace immediately, before damaging the rest of the drivetrain. At a glance, quick check: if the chain pulls away cleanly from the chainring when you tug on it, it's dead. After checking, lubricate: dry lube (wax) for good weather, wet lube (oil) for rainy conditions.
Adjust the gears and derailleur
Shift through all the gears, while stationary on a work stand and then while riding. Imperfect indexing (hesitant shifts, clunking) is often fixed by adjusting the limit screw on the derailleur; a quarter turn is usually enough. If the chain jumps off the cog or refuses to shift onto the larger chainring, it's time to go to the shop: the derailleur's stops and cable tension are adjusted more precisely with the expert eye of a mechanic.
6. Inspect wheels, tightenings, and steering play
Spin each wheel freely: it should turn smoothly, without friction or noise. Place your eye above the brake pads: if the rim deviates to one side, the wheel is warped and needs to be trued. Next, check the tightness of the wheels (quick release or nut), the stem, the handlebars, and the seatpost. The tightening torques are marked nearby (typically 5 Nm for the stem, 5-7 Nm for the seatpost). Grip the front wheel between your knees and try to turn the handlebars: no «clunking» should be heard. If this is the case, the headset needs to be tightened.
🔊 Sound Diagnosis: What Noise = What Problem
- Regular clicking while pedaling Stiff link or loose seat post.
- Squeaking ballerina Headset to tighten or pedals to grease.
- Brake squeal Dirty rotors (isopropyl alcohol or brake cleaner) or worn pads.
- Clunking when shifting gears Indexing to correct.
- Constant wheel friction rim tape or incomplete tightening.
7. Lighting, bell, security (and battery for e-bikes)
Check that the front and rear lights work (batteries or rechargeable), that the bell rings properly, and a detail often forgotten, that the reflectors are clean and securely attached. Are you riding an e-bike? Fully charge the battery, then perform a complete cycle (use + recharge) to wake up the cells. Significantly lower range than before wintering should be a warning: the battery may have suffered from cold storage.
DIY or workshop: how to decide?
It all depends on the time you want to dedicate to it, your tools, and the level of precision expected. Here's a guide to help you gauge (indicative prices in Luxembourg):
| Task | Difficulty | Estimated workshop cost |
|---|---|---|
| Cleaning + lubrication | Easy (15-20 min) | 30-40 € |
| Tire pressure, visual check | Easy (5 min) | Free at BeBike |
| Brake pad replacement | Medium (30 min) | €25-50 + coins |
| Derailleur adjustment | Difficult | 30-50 € |
| Wheel unveiling, headset | Expert | 40-80 € |
| Full revision | All-in-one | 90-130 € |
If you have the equipment, the desire, and 2 hours to spare, DIY is very satisfying. Otherwise, the annual workshop check-up remains the best investment for riding with confidence all season long.
The BeBike Check-up: Making an Appointment in Luxembourg
Our Bicycle repair shop in Luxembourg takes care of your spring overhaul from A to Z, with a free diagnosis before an estimate and a quick turnaround time so you don't miss out on your outings. Also take advantage of our bike repair service (official partner Canyon Service Partner Luxembourg) and our upgrade tips to upgrade your bike this season.
👉 Schedule an appointment
Book your workshop slot online or by phone: contact us.
FAQ - Spring Bike Tune-Up
How long does it take to service a bike yourself?
Allow 1.5 to 2 hours for a complete service, or longer if you’re replacing brake pads or tires.
How often should you get a tune-up?
At least once a year, ideally in the spring before the season begins. A quick second inspection in the fall wouldn't hurt.
Does my e-bike require any special maintenance?
Yes: in addition to the "standard" bike, you need to check the battery, the motor, and the sensors. Our customer service carries parts for the major brands.